
 My front door with snowman greeter
It's beginning to look like Christmas around my house. The day after Thanksgiving is one of my favorite days to start decorating for the holidays. This year I painted snowmen greeters to hang on my front door as well as to give to my friends as gifts. These happy snowmen will bring holiday cheer to my front porch and to all who see them.
Take a little break, pour yourself a cup of tea and let's take a little tour of Debra's Cottage for some holiday inspiration for painting a happy little "snowman greeter" for your holiday door. I will give you a quick how to lesson on painting your very own snowman greeter.

Finding Inspiration at Debra's Cottage . . . . .

Here . . . . . . . .
 There . . . . . .
Everywhere . . . .

How to paint a snowman door greeter.
The snowmen door greeters are so easy to make and will take you about one hour to complete. I like to use a square canvas - 5 X 5 is the best size for the door greeter. You can also use a 5X5 square of plywood. Michael's Craft store is a great place to buy art supplies. They also have pre cut wood boards in all sizes.
Pick a color to use as your background - I paint with acrylic paints as they are not toxic and water based (means easy to clean up ) and used FolkArt #922 -Bayberry. Draw a circle for the head and add a top hat - or any kind of hat you want on your snowman. Then draw a carrot for the nose and a mouth and eyes.

Now you can start painting - you will need several coats of white for the snow - note that I used some lavender on the sides of the face since snow is not pure white. This will give him a more "painterly" look, however; he will look just as cute with pure white. Paint the top hat black and the scarf any color you want. Paint the area under the scarf white for the body.
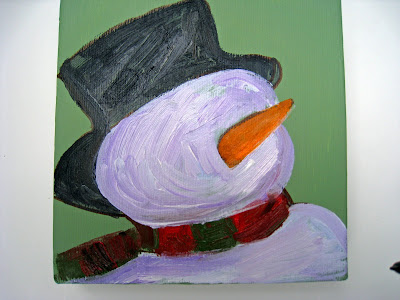
Now for the fun part - putting the finishing touches on your snowman. Put a little white with your black to add high lights to the hat. Paint two black circles for the eyes and a happy mouth. Mix a little red and white to make pink and paint the round cheeks to complete the happy look. Paint your scarf any color - I used red and green to match my front door and added a little red ribbon and holly on the hat. The last step is to add the snow flakes. Thoroughly wet your paint brush and dip it into the white paint - make sure your brush has lots of water - then splatter the paint onto your canvas by hitting the handle of your brush - this will fling the paint all over your canvas to create the look of snow. CAUTION - this is very messy - I put the painting in the bottom of my kitchen sink to do this or better yet - take it outside. The last step is to add screw eyes on the back of the canvas and tie with a bow.
 This is what the screw eyes on back look like. They are very simple to screw in and then thread your ribbon through and tie a bow.

Completed snowman greeter.
Please feel free to leave me a comment if you have any questions about making your snowman greeter. Next time we will paint a pink "shabby chic" snowlady greeter.
No comments:
Post a Comment